Pages

Thursday, March 29, 2012

Not THE Dress, Just all the Rest!

As a celebrity gossip aficionado, I spend a fair share of my day on entertainment websites like Perez Hilton and The Superficial. This is partly due to an unwavering nosiness that requires me to be all up in other people's biz-nass, and partly to see who is dating whom in the celebrity sphere. Neither of these reasons has to do with fashion, but often, these sites are also where I pick up on new trends in clothing.

This was really helpful when it came time to consider what I'd be wearing to wedding celebrations. We've got quite a lot going on with my bridal shower, bachelorette party, rehearsal dinner/welcome cocktail reception and post-wedding brunch. Y'all know how much I dreaded the idea of shopping for my wedding gown so you can imagine the stress of needing to find several more!

I'm pretty traditional in the sense that I really love the idea of making the most of my bride-ness and wearing white to all of our parties. I think it's cute, and quite frankly, I generally never wear the color white because of its affinity to staining, and because white clothing tends to blend in with my sexy, pasty white, Irish legs.

Despite the shortcomings of my natural skin pigmentation, I haven't been able to shake the vision of this:

Image via PopSugar.com
 This dress literally makes me shiver. I.LOVE.EVERYTHING.ABOUT.IT. Period. It's so delicate and beautiful. Rockin' this baby with a nude heal is all I can think about! Now, this is the Notte by Marchesa White Lace Dress and costs roughly roughly $700-$1,000. Not gonna happen. However, The Budgetista has some super swanky alternatives for a fraction of the cost:

Slash Neck Lace Dress. Image via ASOS - $80.57
Lace Dress with Scalloped Neck. Image via ASOS - $80.57
Totally cute, right? And super affordable. At this point I'm on the hunt for a shower dress and rehearsal dinner/welcome cocktail reception dress for the night before the wedding. While I'd love to show up to our post-wedding brunch looking flawless and fresh with a new I'm-still-the-bride outfit, more than likely I'll be in jeans, exhausted, with smeared eyeliner, crazy hair and one helluva hangover.

Macy's has been a great resource for dresses. They offer frequent sales with additional discounts for card-holders. Most of the dresses they have that are appropriate for these parties are on sale for under $55, like this pretty number:

One Shoulder Dress with Rose Detail. Image via Macy's. $46.99
As you can tell, I'm more excited about finding these dresses than I was about my gown and I am fighting my shopping trigger-finger to hold back on making impulsive purchases until we're a bit closer to the date and I've lost a bit more weight.

What are you wearing to your bridal celebrations? Have you already purchased your dresses? Are you going a more traditional route and wearing white or not?

Monday, March 26, 2012

Dressing the Part: Grooms Edition

The men of the wedding officially have clothing! Mr. BB and I headed downtown to Men's Wearhouse yesterday afternoon for our official tux-seeking appointment. We chose Men's Wearhouse over other comparable businesses for a couple of reasons. First, with five paid rentals, Mr. BB gets either a free rental, or a free suit up to a $400 value. We opted for the free rental so that his day-of attire would cost us $0 (ahhh, such a beautiful concept!) Second, Men's Wearhouse coordinates their color selection with David's Bridal, which is where our bridesmaid dresses were purchased. That was a major plus!

We met with our consultant, Nicole, who was pretty awesome. She really made the process easy. Our first choice was to pick the vest. Mr. BB wanted to stick out from his groomsman, and since we knew they would be in the color 'Lapis' to match the BM dresses, he gravitated to an ivory vest to match my dress. So far, so good, huh? It seemed like a natural progression to put our father's in black so that they had their own clothing identity aside from the bridal party. An added plus (which I hadn't even considered prior to our appointment) was that we were able to pick a sleek, modern vest pattern that was available in all three colors. Score!

Personal Photo - black, ivory and lapis vest (sorry for the poor photo quality!)
Personal Photo - Sleek vest pattern

Each vest was paired with a perfectly-matching bow-tie or tie option. Mr. BB opted for the tie. I agreed that this was the most fitting as we're planning to be married on a rooftop garden, so while we consider our event to be formal, it's certainly not black-tie. He also opted to pick white dress shirts with a pleated pattern. I liked the added character of the pleats and am happy Mr. BB chose white as the ivory shirts looked, well, dirty.

Next up was picking the jacket. Mainly, the options were to have one button or two. Or to have regular pocket slits or have fabric covering them. I'm sure there was some sort of fancy, mens-wear lingo used to describe the different pocket designs, but, um, I didn't pay much attention. I did take a picture, though!

Personal Photo
Mr. BB opted for the middle option. Two buttons and regular pocket slits. The remaining decisions were left entirely up to Mr. BB. He opted for plain, black shoes, black cuff links for the guys and white for him, and, his one must-have option: pocket squares. Currently, each guy will have a white pocket square to match their dress shirts. Mr. BB is up in the air about this one as he'd prefer a purple pocket-square to match the guys' vests but they don't offer them in lapis, only plum. The fact that the pocket-squares don't come in all of the colors offered by Men's Wearhouse is weird to me, and slightly disappointing, but oh well.

Total tux cost is $199/piece. However, we were armed with a $40 off coupon for each tux which brought the price down to $159. An additional $7 can be take off the price if the guys opt to rent only one dress shirt versus two (Mr. BB was afraid if it was a hot and sweaty day the guys would like to have another shirt if needed, but mostly, I think it's because he knows he'll inevitably spill something on his shirt within ten minutes of the reception!)

Men's Wearhouse offers a great online tool where we can log into our "group" and view each individual item we've chosen. It breaks the attire down by the specific individual, so clicking on Mr. BB will show his clothing, while clicking on the groomsman or our fathers will show their selections. We can also keep track of which guy has had his fitting, picked up his tux, and returned it. Since this is information that Mr. BB likely won't communicate to me, I like to know that I can simply log in and see who's lagging behind on their duties and help keep them in line (in a very non-bridezilla way, I promise!)

Another wedding-related decision is in the books!

Is your groom opting for a tux or suit? Have you picked it out yet? Did you let your FI make the decisions or did you give him some guidelines to work within?

Thursday, March 22, 2012

The After Party

To quote R. Kelly:

"After the show its the after party. After the party its the hotel lobby. And round about 4 you gotta clear the lobby, then take it to your room...."

Aside from being the song that is credited with inspiring more Instant Messenger away messages on my college campus than any other ("Sippin' on coke and rum, it's like so what I'm drunk"...anybody?), this song, Ignition (remix), has got the right idea.

After our Big Show, there really will be an after-party! The decision to incorporate this additional celebration was really not a decision at all. We just knew it's something we would be doing. What can I say? We know how to party! Our reception ends at 11pm, which is pretty early by our standards, and we have plenty of options on how to keep the celebration going.

Our first option is to head to the first floor of our venue (a hotel) and into the on-site sports bar. The hotel has graciously stated they will keep the bar open until 1am to accommodate our after-party, and we have the option of purchasing $10 appetizers or a few pizzas to serve to our guests, you know, to absorb some of the libations people have been consuming. After that, guests will be on their own to go sleep it off, or host a gathering in their hotel room for the remainder of the evening early morning.

Champions Sport Bar - Image via Marriot
 Our other option is to rent a trolley to transport our hard partyin' guests to a Boston landmark - Faneuil Hall - which boasts an insanely large number of watering-holes within a really small area. As opposed to our other option, this one requires more money on our part. We would need to rent the transportation and most likely, pay money to reserve an area of a bar for us to hang out in since it's a Saturday night - and one of the first weekend nights that all of the college kids in Boston will be back after summer break.

The downside is that it will cost us more money, and we probably won't be able to serve food to our guests. The upside is that the bars are open until 2am so we can totally maximize the night!

For us, as much as we love each other and will be super excited to be married, we'll have a lifetime of time to spend with each other. So why not spend the rest of our wedding night with the ones we love the most instead of hiding out in our hotel room? We may be exhausted, heck, I'm sure we will be, but I plan to suck every damn minute of time out of our wedding weekend! Adding on an after-party just adds to the fun! Plus, we'll have plenty of time to relax on our honeymoon!

Are you having an after-party? Why or why not? If so, what are you planning for after the reception?

Tuesday, March 20, 2012

Soundtrack of the Day

Of all the decisions to be made when planning a wedding, our reception music was not one of them. A friend of Mr. BB is a professional DJ. In fact, on most "Thirsty Thursday's" in college, I could be found at the very club where he spun his tunes. Since then, he has continued to work the college club scene, and, through persuasion from mutual friends, has branched out into wedding's to help create memorable nights like this:

Personal Photo
The decision to hire him was a no-brainer. We know him, we like him, we've seen his work many times over and he's cheap. Boom. Done.

Ceremony music involved a bit more work on our part. For years, I've harbored a burning desire to have an elegant string quartet play as I gingerly walk down the isle towards my future husband, the sounds of Canon in D by Pachelbel guiding my way. This fantasy is somewhat coming true.

Turns out, string quartets are expensive. Who knew? Financing that sort of splurge was pushing it even before I got injured and our budget got slashed, so it was even further out of reach after.

When cutting (or as I like to say, revising) our budget, I knew that I wanted to keep some sort of live ceremony music because I felt that it would make a big impact (ie: class it up) for a relatively low cost. I figured the price of a string quartet would be divided in half if we cut the number of instruments in half! Novel idea, huh? And it was true...by cutting down to a duo the price was cut down by just as much. I further deduced that the same logic would apply if we cut it down to just one, solitary instrument. I was right again! Man, I should be a detective or something!

Personal Photo - The Case of the Declining Vendor Cost!
Next, we needed to decide which instrument. For me, this was either a solo violin or harp, and after we considered it further, we decided a harp would have more depth.

At this point, the hard part was over. Turns out, there aren't many harpists in Massachusetts, and to weed through those few, we used our never-fail, vendor-review tool: Google. From there, we personally contacted every harpist who had consistent 4-or-5 star ratings, and narrowed it down to the two who had the lowest price. Of the final two, one harpist had over 60 reviews (all 5 stars!) and has her doctorate in the harp! Cool, huh? At that point we were pretty sure she was the one!

Dr. Lizary Rodriguez. Image via Gig Masters

She hosted us in her home a few weeks later and began playing selections for us so we could hear them in person. I think she loved us because, aside from the few songs we picked for the ceremony, we gave her free reign to play whatever she pleased for the cocktail hour. Anything from Bach to The Beatles. Are we laid back or what?

It took about an hour to narrow down our ceremony selection:
  • Processional Music:
    • Seating of the grandparents/parents: King William's March
    • Attendants: Jesu Joy of Man's Desiring
    • Bride: Canon in D 
  • Recessional: Pavane
Clips from these songs can be heard, played by our harpist, here.

Beautiful, huh? We're so happy to have found such a great talent and we're even more excited to have live music during our ceremony and cocktail hour!

Are you having live music for your ceremony? If so, was the process of booking the musician(s) easy or difficult? How did you finally decide on the right vendor for the job?

Sunday, March 18, 2012

A Birthday Proposal

While planning future blog topics, I realized I've never told the story of our engagement. Not only did Mr. BB totally out-do himself, but he actually managed to surprise me, which is huge, because I'm a thinker  ridiculous over-analyzer. In any given situation I can create hundreds of scenarios to be prepared for, so a romantic birthday dinner at our favorite restaurant should have caused sirens to go off in my head. It didn't.

The day began with me accompanying a really good friend, E, to a bridal show in Boston. After leaving the overwhelming bridal show, I was pretty excited to not be engaged (as I've mentioned - bridal shows can be stressful!) Mr. BB had been working many, many weekends of overtime on a work project and this day, his 26th birthday, was the first weekend in months that he didn't have to work. We were planning to head to our favorite restaurant, The Oak Room, in the Fairmont Copley Plaza hotel for a nice dinner. All week Mr. BB had been saying he needed to run errands on Saturday so when Saturday came I wasn't surprised he had things to do. E joked that maybe he was preparing an elaborate proposal. I quickly said "yea, right" and didn't think about it again.

Image via The Fairmont Copley Plaza Hotel


The Oak Room - Image via TV trip
Dinner was lovely, and since it is our favorite restaurant, we were pretty excited to be there. While eating, we had a conversation about how we had never seen the rest of the hotel so I wasn't surprised when Mr. BB hopped into an elevator on our way out. I thought he was being clever and we would creep around the hotel to see more of its interior (it's very beautiful and historic!) As we were walking down a hallway, looking at the artwork on the walls, Mr. BB proceeded to pull a room key out of his pocket and open the door to a suite overlooking Copley Square. I immediately noticed two bottles of champagne on ice and a bag of my clothes in the corner of the room! We began to enjoy the champagne. I asked why he did this and he said he wanted to do something nice for the both of us. I felt bad because it was his birthday and I didn't even get him a gift (awful, I know!) After relaxing for a few minutes he proceeded to tell me that we had brunch planned for the next day at The Oak Room, and that he had scheduled me for a manicure, pedicure and massage at a local spa! I was suspicious that something was going on but we continued to relax and chat. After a few minutes, Mr. BB began getting antsy and walked away. I turned to look out the window to Copley Square, and when I turned back around, Mr. BB was on one knee and asked if I would marry him! I pretty much cried like a baby for the next ten minutes and Mr. BB kept repeating "um, say yes, can I just hear you say yes?" but all I could do was shake my head!

Hotel Interior - Image via The Fairmont Copley Plaza Hotel
Copley Square - Image via City Profile

From there I learned that Mr. BB had been to dinner with my parents a few nights before to ask for their permission. We called our parents and spent the rest of the night celebrating with friends!

How did your FI propose to you? Were to totally surprised or did you see it coming?

Friday, March 16, 2012

Organizational Wedding Planning from a Type A Bride!

On any typical day, you would be hard-pressed to get me to acknowledge that I have a type A personality. I love organization, and in my world, everything has it's neat and orderly place. However, on some days I feel as if I teeter on the brink of Obsessive Compulsive Disorder, while others I feel I could be on the TLC show "Hoarders."

You see, my problem isn't the desire or ability to live up to my anal retentive whims, no, it's that I am easily deterred from reaching my organization goals with even the slightest obstacle in my way. And I have a black-and-white mentality. I'm either being super organized or I'm a chaotic mess. No in-between. So, when it's come to wedding planning, I feel as if I cannot possibly continue until I have all of my info in its neat and tidy place, with convenient little boxes to check and to-do items to cross out.

My first stop on the organization train was re-configuring how much we could actually manage to save up for the wedding. Ideally, this would have been done before we booked a venue and committed to a price-point, but where's the fun in that without a little anxiety thrown into the mix? Also, our ability to save money was thrown off-kilter after I stopped working when I hurt my back. I'm happy to say that we have a very reasonable budget and, with all of the cuts made, will still be able to pay cash for our wedding and keep an open bar. I'm sure our guests are sayin' Hallelujah as we speak!
Personal Photo - Click for a larger image!
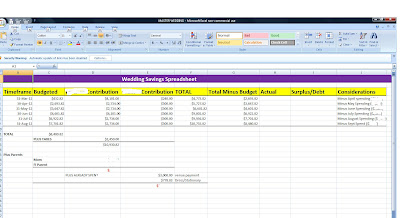
I made a basic excel spreadsheet (and apologize for my limited skill!) I have a column for our time-frame, how much money we currently have in savings (under "budgeted,") my monthly contribution, Mr. BB's monthly contribution, and the monthly total. From there I added another column, "Total Minus Budget," to account for the amount of money I remove from savings monthly to provide for my expenses for the following month. At the end of every month I plan to record what our actual amount of money saved was, and whether we have a surplus (yay!) or are in debt (boo!)

Next up was our overall budget. I found this link on Excel Blog from Office.com and downloaded the wedding budget template. From there, I watched the tutorial for super easy instructions on how to further modify the template to include cute little arrows to denote whether you are over/under budget. Sometimes, a little cuteness makes you feel a lot better about spending too much money, no? See for yourself:

Personal Photo - Click for a larger image!
 I highly suggest using this budget. It's easy to customize. I use the "estimated" budget column to put the actual amount we're spending (estimations be damned!) and use the second column to add what we've already paid for an item. The third column has the cute arrows to denote that, so far, we're under-budget on everything! There is also a nifty pie chart to help you visualize where your money is going.

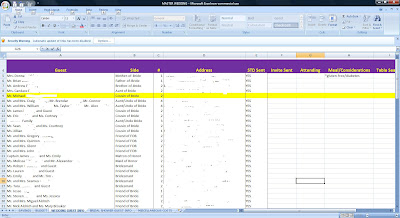
I used a spreadsheet similar to our savings spreadsheet to formulate a master guest list. This sheet includes our guest name, relationship to bride/groom, number invited from each household, and address. From there we added a column to discern whether we have sent a save-the-date and invitation, and further columns to denote whether the guest is attending, meal chosen, table assignment, if they've given a gift and if we've sent a thank-you card. Phew!

Personal Photo - Click for larger image!
My plan today is to work on a "Master To-Do" list. I will be drawing off of lists on weddingwire.com, theknot.com, and a list that came with a wedding binder I received for Christmas. I plan to combine them all and then add some individualized tasks specific to my own wedding. I'm going to put it in Microsoft Word and add plenty of space for additions - I have a feeling my list will keep getting longer before it ever becomes shorter!

I now feel there is a bit more certainty in regard to wedding finances. Not that there wasn't before, but knowing that I have everything in a tidy "wedding" folder on my desktop, with easy access to it, makes my world spin a bit less out of control. The immense thrill of crossing off tasks and checking boxes is enough to motivate me to continue planning with fervor, and if that's not an indication of my Type-A-ness than I don't know what is!

Do you have formal budgets or to-do lists? Did the organization make you feel more in control of your wedding planning?

Wednesday, March 14, 2012

Groom/Groomsman Attire

Hands down, so far, I am the most excited about picking out the groom/groomsman attire! First, it doesn't require me to try on a damn thing, and second, renting Mr. BB's tux won't cost us a cent! If that's not a win-win scenario, than I don't know what is.

Image via LOP Lists O Plenty
It's also exciting because this is going to be the first (and likely only) unilateral decision that Mr. BB will be making in regard to the wedding. The only guideline he's been given is to stay within our deep purple-gold-ivory color scheme.

Well, aside from finding out that Men's Wearhouse (where we plan on renting the tuxes) offers groomsman attire in exact matching colors as offered at David's Bridal for the bridesmaid gear, Mr. BB didn't have any idea of how he wanted to dress his guys.

Until he saw a report about some very fortunate soul winning a $160 million jackpot, when suddenly a vision came to him:

Monopoly Man image via Free-Extras
Okay, maybe that's actually the vision that came to me when he tried to articulate what he had in mind. In full disclosure, this is the same outfit that Mr. BB would like to wear if he ever has to claim a multi-million dollar jackpot and would be televised while doing so.

I'm not too sure about the top hat, nor am I sure if he's serious, but I'm pretty happy that he's thinking about it...even if it means I need to dress as a shoe or thimble and we have have to get married at Park Place.

Is anyone else leaving the groom/groomsman clothing entirely up the groom? If so, did he have any specific ideas about what he would like to wear, or is he totally ambivalent?

Saturday, March 10, 2012

Lighting Up the Night

To cut costs, we've given up many things that had originally been built into our pre-injury, full-income budget. Our $8.00/piece chiavari chairs? A thing of the past. A lavish floral budget? Significantly depleted. Wedding album? We can wait on that.

With 14' ceilings, a seating capacity of 600 people and a carpet that is ugly as sin, we were desperately looking for something that could make the room feel more intimate and give it a certain, je nais se quoi.

Originally we thought tall centerpieces would go a great distance in "filling up" the room. Something like this budget-friendly number, perhaps?

Image via A Night in Bloom Event Floristry
While tall centerpieces help to create "drama," I realized we would need to seek something else that would create a more intimate space and take away from the "vacant" feeling that a large ballroom so often has.

After seeing some lighting inspiration like this, we knew exactly what was missing from our vision:

Image via Syracuse Dram Weddings By Wanna Jam DJ Productions
Up-lighting!!!!!

Doesn't that look amazing?! I was really shocked at how much of an impact the lights make. In every example, the lights transformed an ordinary ballroom into an exquisite area that was warm and inviting. The lights also give a very "polished" feel to the room for a relatively small cost, which is great since we are cutting back on decor to keep the budget in-check.

We started our search at the venue, which would provide us with 16 LED lights for $50/piece. The total cost, not including a lighting professional for the event would come to around $1,040. This is the baseline cost I based all other quotes off of.

I wasn't surprised that many quotes came back in the $1,200-$1,500 range, with various inclusions, considering that many professional DJ companies offer this service, and have high overhead costs. I searched high-and-low for a vendor that would beat our venues cost. Finally, I found a brand new company run by a technician who is just branching out on his own and offering a 50% off sale to get his company off the ground. Score! With his company, our total lighting costs will come to $650.

Par Cans (Image via Musician's Friend)


For full disclosure, LED lights provide an option for wireless lighting that emits less heat and affords you the ability to change colors throughout the night. A cheaper alternative would be to use par cans. The cans require wires to plug the lights into the wall, emit more heat and limit you to one color option for the night, but are a great alternative to LED lights for a fraction of the cost. Both options can easily be rented and placed in the venue on your own with relative ease to save even more money!

We're super excited to have found such a great deal on lighting and help get a new business started, but most of all, we're excited about how well the lights are going to set the mood to P-A-R-T-Y!

Have you thought about up-lighting for your reception? If you used up-lights, was the price worth it?

Friday, March 9, 2012

Bridal Show Inadequacy

The first bridal show I ever attended was for my Maid of Honor (MOH), back in January 2011. From the hoards of over-eager brides and their families, girls sporting bachelorette-type attire, and the bright pink "bride" stickers they made each engaged girl wear, I was thoroughly overstimulated. So was my MOH, which she made abundantly clear as she forced me into the corner, stuck her "bride" sticker on me, and shoved her engagement ring on my finger.

It was clear at this point, that bridal shows are not for the faint of heart.

Image via Colorado Bridal Show

Potential vendors stalked the status of my left ring finger before they would approach me, and when approached, would attempt to lure us to their little corner of the the convention center, like a predator stalking prey.

Maybe I'm being too harsh, but for someone who doesn't like confrontation or medium-to-hard sell situations, it was not my dream scenario. I left the bridal show that day very excited to not be engaged. Mr. BB proposed to me after dinner that very night. How's that for irony?

Since then, I've had a love-hate relationship with bridal shows. My mother loves them with every part of her being and takes personal offense when I lack her over-enthusiasm. To keep the peace, I've attended my fair share with mixed results.

Bridal shows have been such an enormous source of inspiration for me, from floral design to invitation suites to after-party and honeymoon ideas. They have provided a great environment to commiserate with other brides and to meet with several vendors at one time.

Awesome transportation idea! Image via Old Town Trolley Tours
They have also been a source of jealousy and anger for me.

Strolling past the masses of vendors touting their "must-have" wedding accessories like customized tablescapes, photobooths, and ice sculptures, especially when my mother gravitates to those booths (despite me not being able to afford these things,) drives me B-A-N-A-N-A-S.

After a particularly embarrassing experience this past weekend, where a florist essentially laughed at my flower budget of $1500, I swore off bridal shows all together. As a bride, I shouldn't feel bad about my wedding. Ever. Nor should people be telling me (or imply via laughing at what I can/cannot afford) that my wedding isn't "good enough" because I don't have all the bells-and-whistles that a "good bride" should. My feelings of inadequacy were somewhat self-inflicted, but some of it was the result of an over-zealous wedding industry telling me what a wedding should be.

So, I'm at peace with my decision to retire from the bridal show circuit. I'm going to put all of those feelings of wedding inadequacy aside and plan a day that is uniquely ours, whether we have a photo booth and firework display or not!

Have you ever suffered from bridal show inadequacy? How did you combat it?

Wednesday, March 7, 2012

Dressing the Part!

The day has come. A new dawn has emerged, for I, Ms. BB, am officially a wedding dress owner! And I have to say, it wasn't quite the traumatic, melodramatic, depressive little situation I thought it might be. It was, dare I say, somewhat pleasant?

Due to our budget cuts (and a $50 coupon we got at a bridal show,) my appointment was scheduled at David's Bridal. Our backup plan was to scour bridal consignment shops in our area for an affordable dress if the David's option didn't work out. We arrived early to peruse the selection and pick out some favorites. The place was packed, as I was warned it would be on a Saturday. I managed to maintain my composure amongst my ever-increasing dread and anxiety until I saw the consultant that I was assigned to - the nasty woman from my bridesmaid dress appointment! Yikes! I won't keep you in suspense, she wound up being really supportive, especially after I told her I'd rather be getting a root canal than trying on wedding dresses due to my ever-fluctuating weight.

I quickly learned to focus the search on dresses that had a very fitted form, especially at the waist line, as I found it really helped to suck me in. Then we learned that I was looking for a dropped waist and a bit of a flare at the bottom. No, I wasn't one of those girls who came in wanting one thing and left with something they never thought possible. Nope. I was gravitating to, and ultimately settled on the exact dress I always thought I would. I am not going to post a photo of me in my dress yet, as Mr. BB cannot be trusted. For your viewing pleasure, I now present to you......my dress shopping experience in pictures (my face is blurred to spare me, and you from having to look at my incredibly unflattering, awkward facial expressions):

Personal Photo
Personal Photo
Personal Photo - this lil' number was a finalist!

Personal Photo
Personal Photo
Personal Photo
 What do you think?! I'm happy to say that I looked much better in the dresses than I thought I would and I didn't let the posted sizes scare me. Ultimately, I picked a dress that I thought I looked good in, even if I didn't lose another ounce! She is due to arrive in April and I'm super excited to start looking into accessories and hair-styles for the big day!

How was your dress shopping experience? Did you pick something you totally knew you would? Or did you pick surprise you?

Monday, March 5, 2012

Bidding Adieu to Our Save the Dates!

Well, they're ready. We've lined them, addressed them, and then stamped, stuffed and sealed them!

Getting out roughly 100 save-the-dates was no small feat. Especially since Mr. BB couldn't really help. It's not that he didn't have the desire to help, but rather he doesn't have the capability. He has the manual dexterity of a squirrel so any task that requires even the slightest amount of fine motor skill is not really playing to his strengths. Seriously, he has breakfast sausages for fingers, just look for yourself!

Personal Photo - Mr. BB took this from his desk at work after I begged!

So, it's no surprise that I didn't feel comfortable with him helping with the liners, and I certainly couldn't use his boy-font style of writing to address our envelopes. He dodged a bullet when it came to stamping and sealing our envelopes, as I didn't get around to it until today and he's off at work. Next time, Mr. BB, next time.

I purchased a purple pen at the craft store to address the envelopes. For our return addresses, I had hoped to buy a calligraphy stamp from Etsy and use a purple ink pad but time slipped away before I had the chance. I plan to buy something like this for our invitations:

PaperandCalligraphy
Instead, we purchased 100 return address labels that matched our stationary from VistaPrint for $1.49. The problem is that the purple ink on the address label was significantly darker than the ink used for the save-the-dates. I used them anyways, but it slightly hurt my soul that we had three different shades of dark purple between the stationary, addresses and return address labels.

So, now I'm ready to send them off into the world. I feel like a mom waving to her children on the first day of school as they ride off in the big yellow school bus. I'm sad that my little craft project is over, but I'm super excited for people to receive them, and with my increased craft-confidence, I'm looking forward to the DIY projects to come!

Personal Photo
Personal Photo

Adios, little save-the-dates! Do us proud!

Did all of your save-the-date ideas come to fruition? Do you feel a bit sad when you complete a DIY craft?

Sunday, March 4, 2012

DIY Tutorial 101: Invitation Liner Assembly

Now that we've settled on the materials for our envelope liners, let's get down and dirty with developing our template and adhering them to the envelopes!

One: I took one of the save-the-date envelopes and completely de-constructed it back to it's original form like this:

Personal Photo - de-constructed envelope
Be careful when ripping the envelope apart. You don't want to rip the back or the top flap as you will want to use those pieces when tracing the actual template onto the wrapping paper. Ripping those parts may distort the shape of the template, and skew your template tracings.

Two: Use the xacto knife and the ruler to cut a straight line. I cut off all of the flaps except for the top one.

 
Personal Photo - cutting off the flaps

Personal Photo
Three: I used my ruler to measure even markings slightly below the glue line of the envelope.

Personal Photo  - creating markings
After the markings were placed, I followed them to create straight lines:

Personal Photo
I then used the xacto knife to cut along those lines and decrease the size of the flap. I did this so that when the template was created, the flap would be short enough to not obstruct the glue lines on the envelope, which would prevent the envelope from being sealed before mailing:

Personal Photo - flap sized so as to not obstruct the glue adhesive

Four:  I took our new template and superimposed it (put it) on the wrapping paper. I then traced it with my pen.

Personal Photo - getting ready to trace the template
I had difficulty tracing the liner template onto the wrapping paper because the template (made out of the envelope) was so thin. Eventually, I got the the hang of it, but I would recommend tracing the template onto cardstock or cardboard and using that as the template because it will be easier to trace around a thicker material.

After I cut out the first template I tried to insert it into an envelope to see how well it worked. I had some difficulty keeping the liner smooth when it was inserted, so I decided to cut the back of the liner in half to create a "cheat" liner. This way, the liner only goes halfway down the envelope. Not only does this save paper, it made it easier to manipulate the actual liner if I felt like it needed repositioning to align with the angle of the envelope flap.

Personal Photo  - "cheat" liner template

Five: I then used the ruler to align with the lines I had traced, and used the xacto knife to make the cut. I used a flimsy plastic ruler for this job, but I would recommend a heartier wooden ruler so the xacto knife can't easily cut it if it veers off course.

I would also invest in a paper cutter for this part. Sometimes, the xacto knife would get stuck in the cutting mat as I was cutting the template and this would create a jagged cut-line. Sometimes I could easily fix it by trimming off the ruined part, but other times, cutting off the jagged part would ruin the template flap angle and it wouldn't look right when it was put into the envelope.

Six: Put the liner in the envelope. This is pretty easy. I put them in, adjusted them for a good fit, and then used my ruler to fold over both the flap and the liner to create a crease:

Personal Photo - using the ruler help form a crease
Personal Photo - appearance after liner  and envelope flap were folded over to form a uniform crease
Seven:  I then folded over the envelope liner in preparation for the adhesive application:

Personal Photo - liner folded over
Eight: I applied the adhesive to the outer edges of the flap in a triangle formation, and then added a small horizontal stripe of adhesive in the middle of the folded-down flap. I found that there wasn't much of a difference between the spot adhesive and the glue stick. The liner wound up being smoother when I used less glue, so eventually I stopped using adhesive on the horizontal edge of the liner:


Personal Photo - the red line at the top is where I eventually stopped using adhesive

Nine: I gently lifted the liner flap and pressed it onto the envelope to adhere it.


Personal Photo
Ten: I then used my ruler on the inside and outside of the envelope flap to try and smooth it for a really professional look:

Personal Photo - smoothing the edges
 Eleven: This is your finished product. Repeat as many times as needed.


Personal Photo  - finished product!


Twelve: Your done! This is a monotonous, time-consuming process, but once you find your groove you'll be flying through 'em! Now grab a beer, sit down, relax and admire your handy work! You deserve it!